警告
本文最后更新于 2021-10-06 12:37,文中内容可能已过时。
基本语法
# 创建元素、标签
React.createElement()
# 渲染元素到指定的位置
ReactDOM.render()
#
React.Component
例子中的html
 1
 2
 3
 4
 5
 6
 7
 8
 9
10
11
12
13
14
15
16
17
18
19
20
| <!DOCTYPE html>
<html lang="en">
<head>
<meta charset="UTF-8">
<meta http-equiv="X-UA-Compatible" content="IE=edge">
<meta name="viewport" content="width=device-width, initial-scale=1.0">
<title>Document</title>
<script src="./node_modules/react/umd/react.development.js"></script>
<script src="./node_modules/react-dom/umd/react-dom.development.js"></script>
<script src="https://unpkg.com/babel-standalone@6.26.0/babel.js"></script>
</head>
<body>
<div id="app"></div>
<script type="text/babel">
例子中的代码在这里
</script>
</body>
</html>
|
JSX
js中写html,html中写js。
例子
1
2
3
4
| # 将ele元素渲染到id=app的标签中。这里没有使用React.createElement(),而是使用的es6的语法糖
var name = 'soulchild';
var ele = <h1 className="myclass" >hello {name}</h1>;
ReactDOM.render(ele,document.getElementById('app'));
|
组件和props
函数式组件(无状态)
 1
 2
 3
 4
 5
 6
 7
 8
 9
10
11
12
13
| # 将元素内容定义在函数中,使用return返回。函数名就是组件名。
function Info(props){
return <div>
<h1>姓名: {props.name}</h1>
<p>年龄: {props.age}</p>
<p>擅长: 梦游</p>
</div>
}
ReactDOM.render(
<Info name="SoulChild" age="18" />,
document.getElementById('app')
)
|
类组件(有状态)
 1
 2
 3
 4
 5
 6
 7
 8
 9
10
11
12
13
14
15
16
| # 需要继承React.Component,class组件还需要render+return。
# 类组件在调用时会创建一个实例,然后通过调用实例里的render方法来获取元素。
class InfoPlus extends React.Component{
render(){
return <div>
<h1>姓名: {this.props.name}</h1>
<p>年龄: {this.props.age}</p>
<p>擅长: 梦游</p>
</div>
}
}
ReactDOM.render(
<InfoPlus name="SoulChild" age="18" />,
document.getElementById('app')
)
|
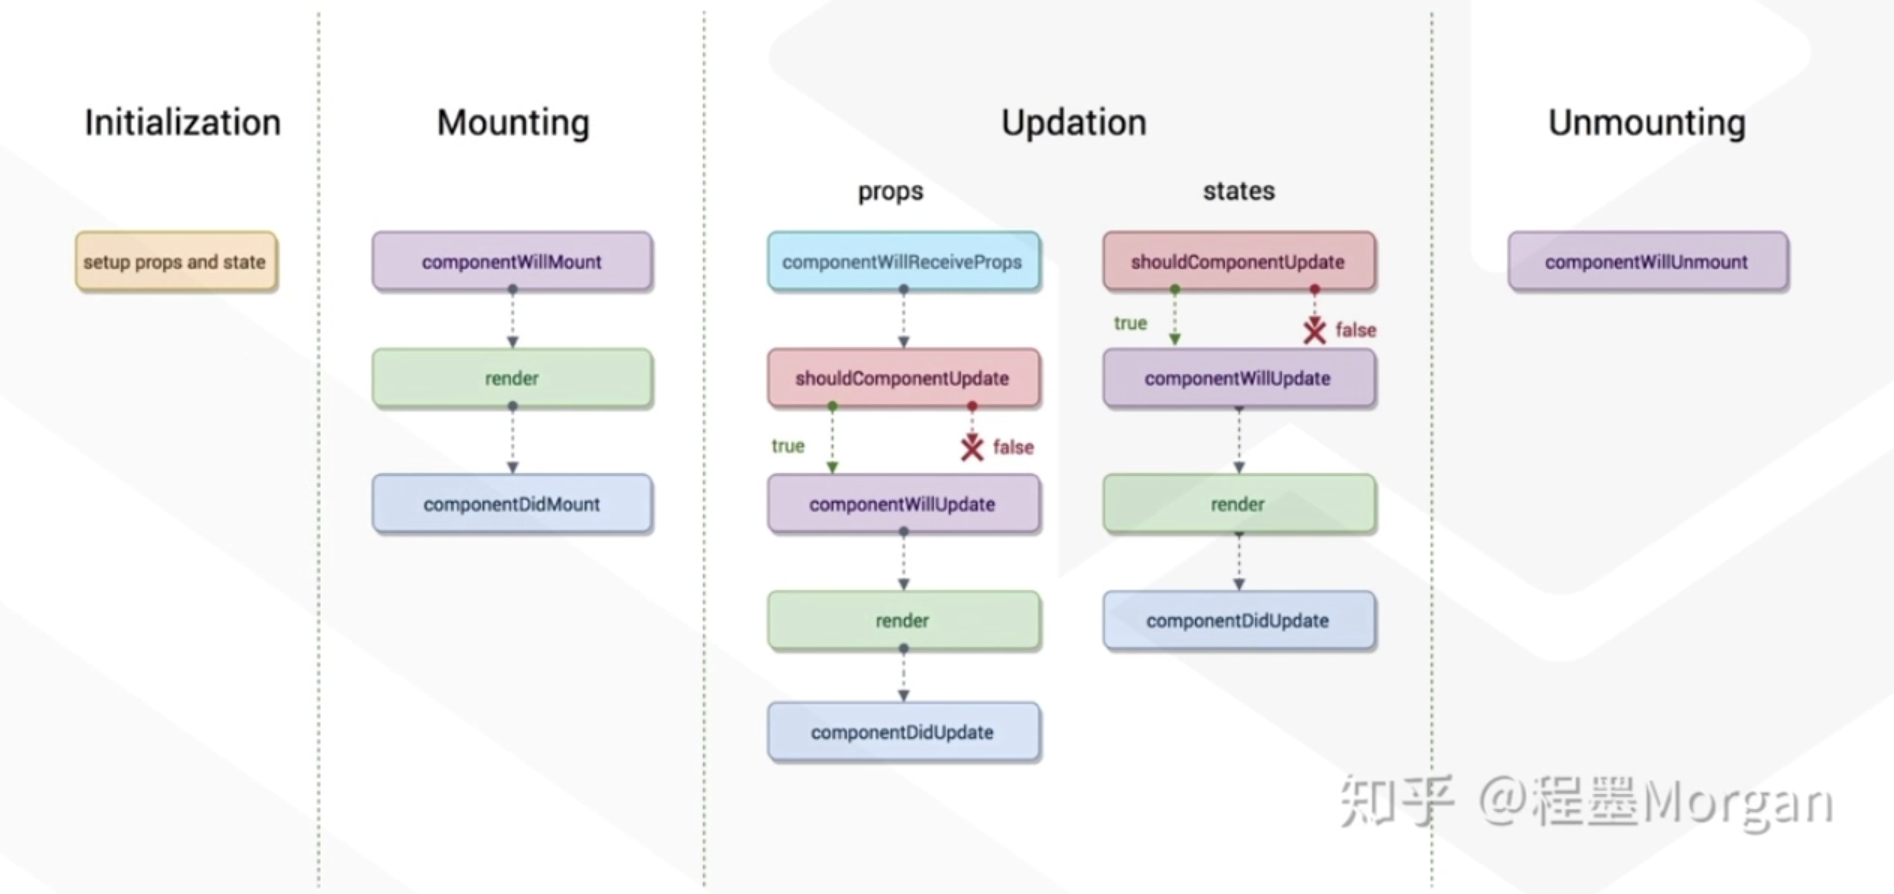
React生命周期
 93784-ecbxjjqy50i.png
- Initialization-组件初始化阶段
- Mounting-组件加载阶段
- Updation-数据更新阶段
- Unmointing-组件销毁阶段
 1
 2
 3
 4
 5
 6
 7
 8
 9
10
11
12
13
14
15
16
17
18
19
20
21
22
23
24
25
26
27
28
29
30
31
32
33
34
35
36
37
38
39
40
41
42
43
44
45
46
47
48
49
50
51
52
53
54
55
56
57
58
59
60
61
62
| class InfoPlus extends React.Component{
// 定义钩子函数
constructor(props){
// 初始化props
super(props);
// 初始化state
this.state= {
name: 'SoulChild',
age: '18'
}
console.log('Initialization-数据初始化阶段')
}
componentWillMount(){
console.log('Mounting(componentWillMount)-组件将要加载')
}
componentDidMount(){
console.log('Mounting(componentDidMount)-组件已加载')
}
componentWillReceiveProps(){
console.log('Updation(componentWillReceiveProps)-不知道')
}
// 是否允许更新数据
shouldComponentUpdate(){
console.log('Updation(shouldComponentUpdate)-要更新数据吗')
return true; // 允许
}
componentWillUpdate(){
console.log('Updation(componentWillUpdate)-数据将要更新')
}
componentDidUpdate(){
console.log('Updation(componentDidUpdate)-数据已更新')
}
// 这里使用的箭头函数。使用普通函数获取不到this。
updateUser = () => {
this.setState({
name: 'TC',
age: '19'
})
}
render(){
console.log('Mounting or Updation(render)-组件加载或数据更新')
return <div>
<h1>姓名: {this.state.name}</h1>
<p>年龄: {this.state.age}</p>
<p>擅长: 梦游</p>
<button onClick={this.updateUser}>更新数据</button>
</div>
}
}
ReactDOM.render(
<InfoPlus />,
document.getElementById('app')
)
|
表单、TODO应用
 1
 2
 3
 4
 5
 6
 7
 8
 9
10
11
12
13
14
15
16
17
18
19
20
21
22
23
24
25
26
27
28
29
30
31
32
33
34
35
36
37
38
39
40
41
42
43
44
45
46
47
48
49
50
| class List extends React.Component{
constructor(props){
# 使用state之前必须先走这个
super(props)
# 定义两个空值
this.state = {
val: '', // 作为临时存储,每次输入内容后都会被替换
list: [] // 一个列表,存储所有添加进来的内容
}
}
// 将input框输入的内容暂存到state.val中
handleInput = (event) => {
this.setState({
val: event.target.value
})
}
// 读取val的内容将其添加到state.list中
handleAdd = () => {
const { val, list } = this.state
list.push(val)
// 要想改变数据时同步更新到页面中,必须使用setState
this.setState({
list: list
})
}
render(){
const val = this.state.val
const arr = this.state.list
let itemList = [] // 存放所有li标签元素
// 通过循环出state.list中的值,生成li标签,最后push到itemList
arr.map((item,index)=>{
let li = <li key={index}>{item}</li>
itemList.push(li)
})
return <div>
<div>
<input type="text" value={val} onChange={this.handleInput} />
<button onClick={this.handleAdd}>添加</button>
</div>
<ul>
{itemList}
</ul>
</div>
}
}
ReactDOM.render(<List />, document.getElementById('app'))
|
 微信号
微信号 微信打赏
微信打赏